PHOTOGRAPHY
Photodocumentation: Optimizing Today's Contact Lens Practice
BY Carol A. Schwartz, OD, MBA
November 1998
No descriptive phrase or pen-and-ink sketch in the patient's chart can give you as much information as a photograph. So warm up your trigger finger because there may be a new standard in contact lens practice.
There was a time when records consisted of only paper and ink. What the doctor saw and then wrote or dictated to file was pretty much all that could be expected. Technology has changed all that. The definition of what constitutes a patient record or what serves as the standard of care in keeping patient records is somewhat more obscure today, but may include slides, hard copy images and digital images. Chief among these elements for contact lens practitioners are digital or film images, but the type of services you provide dictate to some extent the type of record that will prove useful. For example, an eyecare professional performing an orthokeratology procedure needs to document baseline findings to illustrate the patient's status prior to contact lens fitting. In addition to refraction, some description of the corneal shape is also a must. Keratometry readings might suffice, but the standard of care is quickly moving to corneal topography.
Photography often comes to mind for documenting pathology, but it also has great potential for use in contact lens practice. Contact lens fitting following penetrating keratoplasty, radial keratotomy, photorefractive keratectomy, giant papillary conjunctivitis and neovascularization are all examples of cases where photodocumentation of baseline findings and progress examinations are useful.
Liability Issues
"Initially I started photographing just for teaching purposes, but now I do it from a liability standpoint," explains Shelly I. Cutler, O.D., of North Wales, Pa. "These days, patients will accuse you of all sorts of things." Dr. Cutler cites the case of one of her colleagues who dilated a patient with an iris-attached IOL, which later released into the anterior chamber. Two years after that exam, just prior to the statute of limitations expiration, the patient sued. Since the doctor had maintained good records that included photographs taken then and at prior dilated examinations, the case was dismissed as a nuisance suit.
A photo may be worth a thousand words, but sometimes it's worth much more, says Michael Harris, O.D., J.D., M.S., associate dean of the University of California School of Optometry. "A photograph, especially one that is dated, is much more convincing to judge and jury than any amount of testimony," Dr. Harris explains. "Whenever possible, you should document any high-risk patient or procedure."
Other Incentives
Of course, liability is not the only reason to perform photodocumentation. The most common reason is simply to refresh your own memory. Instead of trying to remember how big that infiltrate was last week, you can compare the two images and measure.
"There are many things you see that you want to follow," agrees Douglas P. Benoit, O.D., of Concord, N.H. "It's more accurate to follow conditions from a photo than from a simple diagram." The biggest payoff, however, may be in patient education. "It gives patients a better understanding of their condition," adds Benoit.
Dr. Kenneth Maller of Coral Springs, Fla., uses his video capture unit to show presbyopes how their multifocal lenses move on the eye. "It helps them understand how their lenses work and how to make them work better," he says.
Photodocumentation is the best tool for showing patients their cataracts, according to Doug Cook, O.D., who practices with his wife Lisa Cook, O.D., in Guthrie, Okla. "I use it to show them their white pupil," he says.
The Traditional Approach
Within the category of photography, there are three basic options: film, video with digital capture capability or digital still camera. Film has the advantage of history; it's been used for years. Plus, it's readily available and relatively inexpensive. Dr. Benoit uses a slit lamp with a 35mm camera, and he reports that the camera unit costs about $1,500 over the cost of the basic slit lamp.
A good 35mm image will also provide better resolution and definition than a digital or video image will. Even die-hard video users will admit that the quality from video or digital cameras can't match that of 35mm film. "Image quality of digital is somewhere between a Polaroid and 35mm," acknowledged one guru. Dr. Benoit feels that a film system is easy to use and notes that it's easier to make hard copy prints from film than from video. The downside is time-- 35mm film, such as Kodak ektachrome 100, must be sent out for processing. Most clinicians shoot slide film, which usually takes two to three days before the images are ready.
The Digital Age
"Forget film!" says Milton M. Hom, O.D., of Azuza, Calif. "Digital's the way to go. If you take a bad photo, you know immediately and can reshoot it."
The immediate gratification that video offers was cited by several practitioners, including Dr. Cutler, who adds, "Patients like to be able to see what I'm doing." Drs. Cutler, Cook and Cook use video cameras. Dr. Cutler, who works in several ophthalmology practices, finds that her small, handheld unit is invaluable because it is portable. It attaches to any slit lamp, microscope, lensometer or radiuscope, or it may stand alone. It can also be attached to a camcorder or PC (with appropriate video card), and it sells for just over $1,000. Dr. Cutler uses it with her camcorder, but finds that the downside is the small viewing area. "I'd like a bigger screen so patients could get a better view," she explains. Keep in mind, though, that some systems can be attached to any size monitor.
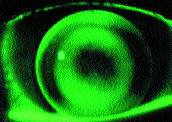
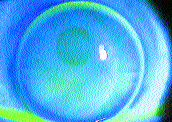
Drs. Cook and Cook built their own video unit four years ago. "We realized that most of the parts were available in consumer outlets," says Dr. Doug Cook. "We bought only the beam-splitter and C-mount for our slit lamp from ophthalmic sources." Their video system is wired to a monitor and video printer. Using a button wired to the slit lamp, they can freeze an image, preview it, and decide whether or not to print it without touching a keyboard. The cost of each image, printed as hard copy using a dye sublimation printer (which costs approximately $600) is about $1.00. "It's also a poor man's fundus camera," he explains. "We get fundus shots by using our camera and the 90D lens." The Cooks also use their video system to document eye movements, such as nystagmus, and pupil anomalies. Figures 1 and 2 illustrate images the Cooks captured with their digital camera.
Dr. Maller uses a digital camera mounted on a slit lamp and a software package called "Reveal TV for PC" to capture, freeze and save images. He admits his set-up is cumbersome, but when he purchased it two and a half years ago, it was the only thing available. Dr. Maller cautions those shopping for photodocumentation systems to brace themselves.
"It's exactly the same as computers -- whatever you buy, you don't even make it to the checkout counter before it's obsolete!" he says. "You have to figure out if it will do what you want it to do, bite the bullet, and then just use it until it's absolutely antiquated." For example, his current unit cannot easily make a hardcopy image to file, but he promises that his next system will include this capability.
Image Storage
Where and how to store images is an issue with photodocumentation. Of course, the matter is relatively straightforward with film. You can insert the best or most representative slide into a slide sleeve (sold as full-page sheets) and staple it into the patient record. Because slides and photographs can be removed from the file inadvertently or otherwise, it's important to always label the slide with patient's name, the eye that's shown (right or left) and the date. Undated, unlabeled photographs may or may not be admissible in court.
New technology brings new challenges in record-keeping. Ideally, you would print a hard copy of each relevant image for file.
"Printing from digital with an ink-jet printer is slow and it drains the cartridges," says Dr. Hom. "This is very costly, and some ink-jets require coated paper which adds to the expense."
Storing images on disk can also be costly and awkward. Bit-mapped images take up a lot of storage space, and in a busy practice, they can eat up most of a hard drive in no time. They can be transferred to a floppy disk to be included in the patient record, or stored on a separate hard drive filed by patient name and date. Keeping patient records on a hard drive exposes them to the potential of getting lost, misfiled or damaged. Newer Zip drives, which hold more data, can alleviate the hard drive crowding, but at about $10 per disk and thicker, they're not suitable for storage in a patient file. Floppy disks are more reasonable, but may make records bulky.
Storing images on videotape can be even more cumbersome. All of these routes require you to find and load the image when you want to view it, which can be time-consuming. All of the practitioners using digital or video interviewed for this article noted this problem, and none has a filing or storage system they consider to be ideal. As long as patient records are maintained on paper, paper print-outs will logically remain the preferred option.
Using film or having the capability to print your images makes a great deal of sense if you routinely need to share patient information. "I sometimes send photos for a completed fitting as part of my case report to a referring ophthalmologist," says Dr. Benoit.
The Reimbursement Question
Can these units pay for themselves? Charging for photography and getting third-party reimbursement are tricky subjects. Most of these fitters agree that photodocumentation is not necessary for a routine contact lens fit.
"Since I'm doing this for my own purposes, I don't charge," says Dr. Cutler.
On the other side are the Cooks, who say they use their photo system "judiciously but frequently." They routinely charge for photography. "Insurance will reimburse for fundus photography and anterior segment if it's needed," they say. "Our system has more than paid for itself."
Dr. Benoit agrees, stating that if he's photographing something that needs to be followed, he will charge for his services and bill it to insurance. If he's taking the photo for teaching purposes, however, there is no charge to the patient or the insurer.
Improving Your Photographic Skills
The number one tip for better photodocumentation is simply to practice using your unit at every opportunity. These photographers agree that experience is the number one element in building your photographic skill, regardless of which system you use.
"The real key is lots of practice," suggests Dr. Benoit. "Shoot everyone who will sit for you, and learn the capabilities of your particular unit."
Most of the common problems in getting good anterior segment photos involve lighting -- either too much or too little. Dr. Benoit feels that the guidelines published by the manufacturers call for too much illumination, which results in washed-out images. "Bring down your flash and background illumination, especially when shooting light-eyed patients," he says.
The toughest photos for Dr. Maller are fluorescein patterns. A yellow filter helps, but the photo itself is dark and details are hard to see. He suggests using the full slit lamp beam for maximum illumination. One way to improve image quality, he says, is to increase the amount of light by using a binocular indirect ophthalmoscope. "Of course," he adds, "the patients find this uncomfortable... it's not something they appreciate." For other anterior segment conditions, such as pingueculae or pterygia, the video works fine.
In the Cook practice, they routinely use filters to enhance the video image, although Dr. Doug Cook admits that good cornea shots are difficult to obtain due to the lack of a flash. "Photographing a nebula is difficult, although a leukoma is easy," he explains." To teach yourself, you just have to start shooting lots of pictures." Red eyes tend to show up as more red, so to show detail on a shot of GPC or a similar condition, he suggests using a red-free filter. A yellow Wratten #15 filter will improve the quality of fluorescein pattern images.
To ensure capturing at least one quality image, especially in cases where a photograph is really important, try shooting two or three images instead of only one. Just make sure to label each shot so that when you sort your slides, you'll know what you have. Another valuable technique for improving the quality of your images is called "bracketing." This requires that you shoot multiple images at varying magnifications and illuminations. This is particularly important when you first purchase an imaging system, since the flash output differs for each manufacturer. In other words, an exposure setting on "high" for one manufacturer's system may be equivalent to a "medium" exposure setting on another manufacturer's system. As you become acclimated to your system, you'll begin to understand which settings are appropriate for which cases.
More tips for good imaging may be found from the Ophthalmic Photographers' Society, Inc., an organization with a 29-year history of providing educational programs to "encourage and maintain the highest levels of quality in ophthalmic photography" and to "stimulate development of new and improved techniques and equipment." Digital imaging, rather than darkroom instruction, is the organization's focus today since so many practices are switching to digital systems, according to Barbara McCalley, OPS manager, Membership Office. For more information about the organization or to read a copy of its bimonthly newsletter, visit its homepage at http://webeye.ophth.uiowa.edu/ops/index.htm. Other sources of information include the Optcomlist Internet discussion group (limited to optometrists) as well as representatives of equipment manufacturers.
Photography, like corneal topography, has not yet become so common that it is considered mandatory to meet standard of care. Yet for some specialties, it is rapidly approaching that point. Contact lens practitioners in particular find it useful to document patient status for legal purposes and as an adjunct practice for patient education and internal marketing purposes. Like any other facet of technology, the number of options is rising, and the price of each unit is dropping almost daily. As these fitters attest, if you are not already routinely photographing patients you will be shortly. CLS
Dr. Schwartz is a contact lens consultant in Vista, Calif., and is editor of Specialty
Contact Lenses: The Fitter's Guide.

Carol A. Schwartz, OD, MBA

FIG. 1: Fluorescein shot of an RGP lens on a keratoconus eye, taken via a digital imaging system.
"The biggest payoff from ophthalmic photography may be in patient education."

FIG. 2: Fluorescein shot of an RGP bifocal contact lens taken via a digital imaging system.

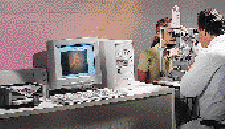
Digital imaging system. The image on the screen shows the slit lamp view and may be captured to disk or hard copy.


