In the last decade, orthokeratology (ortho-k) has moved from a niche service into the mainstream. We should all be familiar with its use as a tool in myopia progression management; however, we shouldn’t forgot that it’s also a great modality for adults. If you are on the fence with getting started, here are some tips to help you get moving.
Five Steps to Fitting Ortho-k
- Start with one lens design. The choice of ortho-k lens design can be overwhelming…so many designs are available! Start by learning one ortho-k design inside and out before trying additional designs. The choice of initial design is up to you, as all of the designs can work well. Consider starting with a GP lab with which you already have a relationship, and see what design they recommend. It could even come down to what return and exchange policies work best for your practice. As you gain experience, then you can branch out to different designs.
- Understand the basics. Reverse-geometry lenses for ortho-k are unlike other contact lens designs. There are several zones to understand. Starting from the center and moving outward, the base curve (BC) is usually flatter than K by roughly the amount of correction needed. The reverse/return zone is steeper compared to the BC to bring the lens back toward the corneal surface. The alignment/landing zone matches the peripheral cornea to “land” the lens and provide centration. You don’t need to be an expert; lab consultants can help you get up to speed on the basics as well.
- Dig out your Wratten filter. If you don’t prescribe many corneal GP lenses, your yellow Wratten filter may be collecting dust in a drawer. Take it out and use it when you evaluate your ortho-k fits. The yellow filter makes it much easier to see the fluorescein pattern (just like we learned in school!).
- Choose easy patients at first. You don’t want your first experience with ortho-k to be needlessly challenging. Refractive errors between about –1.00D and –3.00D are straightforward to fit and usually result in rapid changes and good success. You could also start by fitting family and staff members to gain some experience before fitting “real” patients. What you learn from these first, easy cases will help you gain confidence.
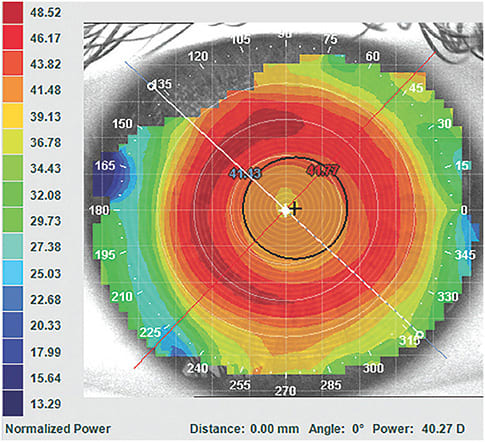
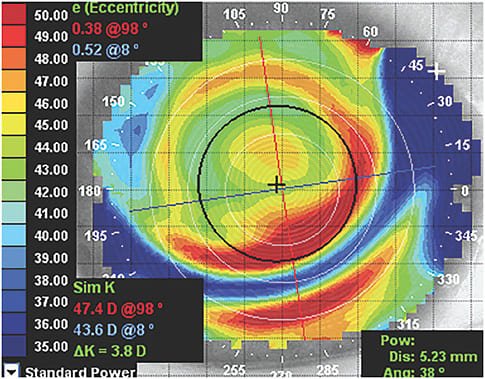
- Trust the topography. Assessing a lens on an eye is important, but more important is evaluating what that lens does to the cornea. You can’t know what happens when the eyes are closed during sleep until you look at the post-wear topography. Your aim is a beautiful bulls-eye pattern that is well-centered on the cornea (Figure 1). Lenses that ride too high or low produce predictable patterns (Figure 2), and these are used to troubleshoot and adjust parameters if needed.


Dive in
As always, your lab consultant is invaluable in helping you through the fitting and follow-up process and in making any parameter adjustments. Of all of the specialty lens types to fit, ortho-k is still my favorite; I hope that these suggestions help you get started. CLS


