This article was originally published in a sponsored newsletter.
When it comes to designing and dispensing orthokeratology lenses, practitioners are fortunate to have excellent topography and lens design systems. Most patients are going to be able to achieve successful treatment with their initial lenses. But there will be patients who need a little fine-tuning of their device from time to time, especially those who have higher refractive errors and astigmatism. With little need, and therefore little practice on prescribing lens adjustments, how do we make the most of our conversations with lens design teams?
Describing the Lens on Eye: Center to Periphery
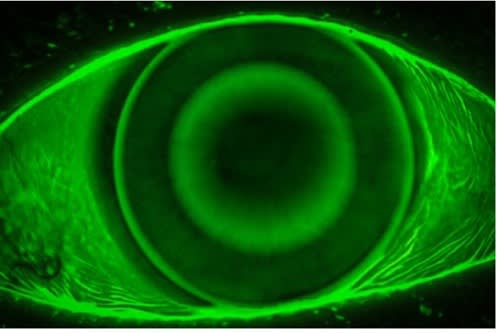
A first introduction into the way an orthokeratology lens should look like on an eye is often described as a “bullseye” pattern, with an area of touch centrally and a mid-peripheral reverse curve that lights up with sodium fluorescein (NaFl) under cobalt blue light. However, just because this is present doesn’t mean the fit is successful. A lens that is too shallow or a lens that has poor alignment in the mid-peripheral curves can still create a bullseye pattern.
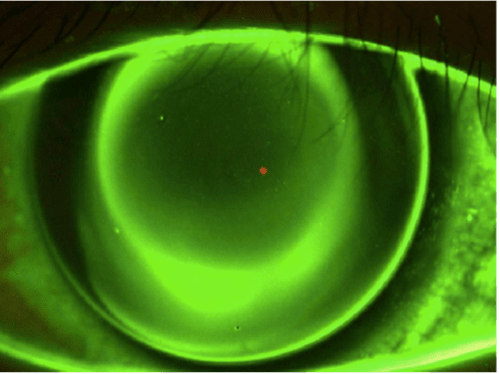
When describing the central fit, the optical zone should be fairly centered over the pupil and some NaFl should crest over the cornea as the lens moves slightly on blink. If there is an area over which the NaFl is unable to glide, the lens may be too shallow, and the epithelium may be at risk for breakdown. On the contrary, if there is complete coverage with NaFl, the lens may be too deep, and proper epithelial molding may not take place. A consultant at a laboratory would be able to help make these adjustments to the lens design with descriptions of the central alignment and NaFl patterns.
Moving outward, look at both the reverse curve (illuminates with NaFl) and the alignment curve (absent of NaFl) rings. Both areas should have defined borders to the surrounding zones. NaFl from the reverse curve ring should not pump under the alignment curve; this usually indicates some toricity on the cornea that needs more (or less) toricity in the lens to better align to the cornea. Without proper sealing between these zones, the center molding effect may not take place, leaving the patient with subpar vision. Photos are helpful in describing this scenario. However, if a camera is not handy, communicating the meridian of poor alignment can be helpful when designing a new lens (Figures 1 and 2).


Lastly, the very peripheral curves should show a small amount of lift, enough to exchange NaFl and allow for a little movement with blinking. Excessive edge lift can irritate the palpebral conjunctiva and interact with the eyelids to create excessive lens movement. Another pearl to communicate with your laboratory in relation to the eyelids is to evaluate the lens positioning with and without the eyelids against the globe, especially if you’re encountering a lens that frequently decenters. If the lens centers well when the lids are pulled away, the modifications made will be different than if the lens is decentered without the lids involved. If there are rotation markers, be sure to note and communicate their position and rotational stability, as well.
Lab consultants are an underutilized resource in specialty lens fitting. With proper documentation and thoughtful communicating, they can reliably use practitioners’ descriptions to improve outcomes when needed.


